| REQUIREMENTS |
| Permission |
All user levels |
| Connectivity |
Online and Offline |
This page describes how to customize an observation entry form for the specific needs of your operation.
Background
Many operations will routinely carry out observations that are a subset of observations permitted under OGRS. The infoEx system permits you to drag and drop all observation fields into a custom data entry area so that they are grouped together in one spot. The positioning of fields can also be adjusted to match the order of your operation's field books, or to match the flow of information in your operation.
Step-by-step description
The observation entry forms can be customized from wherever they were accessed
- Any of the options under the OBSERVATION menu ('Enter & Submit', 'Enter & Share', 'Review & Submit')
- Observation entry screen in workflows
| NOTE |
The customization of observation entry screen is a computer-specific setting! The customization has to be recreated on each computer you are using to enter observations. The reasoning for this is that you might be using computers with different screen sizes that will require different customizations. |
| NOTE |
Once the observation entry forms have been customized on a computer, anybody using the InfoEx application on this computer will see the same customized forms. |
| 1.
|
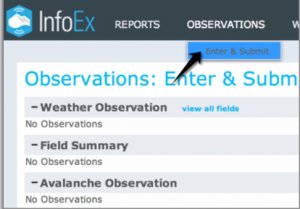 Fig. 1: Select 'Enter and Submit' under 'Observation' |
| 2.
|
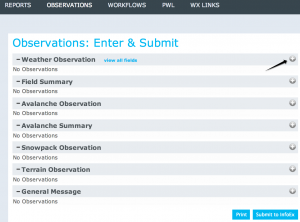 Fig. 2: Expanding the section for customization  button to expand the section you want to customize. button to expand the section you want to customize.
|
| 3.
|
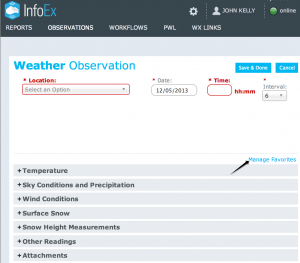 Fig. 3: Enable managing of favourites
| NOTE |
The application will respond with the message: 'Please Wait, Preparing Form for Customization' and the title 'Manage Favourites' will switch to 'Save Favourites' |
|
| 4.
|
 Fig. 4: Creating the custom observation space
| NOTE |
The size of the custom observation space can be adjusted at any time while you are in customization mode |
|
| 5.
|
 Fig. 5: Expanding the Observation Section |
| 6.
|
 Fig. 6: Dragging Observations to the Custom Observation Space
| NOTE |
You can adjust the position of all labels within the Custom Observation Space at any time when you are in customization mode by positioning the cursor on their label and dragging them to the desired location |
|
| 7.
|
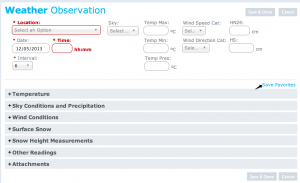 Fig. 7: Saving a Custom Observation Template
| NOTE |
Once saved the custom configuration will always be used for any observation entry of this type (eg. weather observations) |
| NOTE |
You may record other observations that are not in your custom observation template by expanding the appropriate section and entering the observation |
|
Related documents
[1] Click to watch a help video
[2] Click to watch a help video
Functionality tested by


