Difference between revisions of "Creating a new operation PWL"
Jump to navigation
Jump to search
m (→Step-by-step description) |
m |
||
| Line 41: | Line 41: | ||
|} | |} | ||
|} | |} | ||
| + | ==Related documents== | ||
| + | * [[Community PWLs]] | ||
| + | * [[Persistent weak layer overview]] | ||
| + | |||
| + | ==Functionality tested by== | ||
| + | * Date: Nov. 30, 2013 / John Kelly / QA Server / Version 3.0.0 | ||
| + | |||
| + | [[Category:Workflows]] | ||
Revision as of 16:00, 30 November 2013
| REQUIREMENTS | |
| Permission | Operation administrator and higher |
| Connectivity | Online |
This document describes how to create an operation PWL in the infoex system.
Background
An Operation PWL is a locally defined snowpack layer. The dating, description and name of the PWL is specific to a single operation.
The following information assumes you are logged in to the InfoEx application and you have selected an operation (if you have more than one valid operation).
Step-by-step description
| 1. | Activate the PWL menu from the main infoEx menu. | ||||||||||||
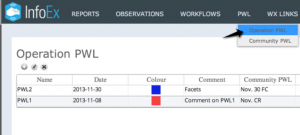
| 2. | Select Operation PWL (Fig. 1). The current list of Operation PWLs is displayed. | ||||||||||||
| 3. | Select | ||||||||||||
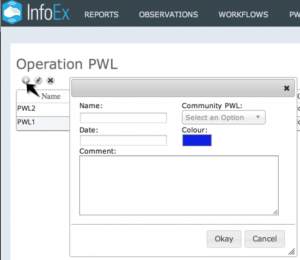
| 4. | Provide the following information for your Operation PWL (see Fig. 2)
|
Related documents
Functionality tested by
- Date: Nov. 30, 2013 / John Kelly / QA Server / Version 3.0.0

