|
|
| Line 94: |
Line 94: |
| | |A 'snowpack' step allows the workflow user to add a snowpack description in narrative form. The following information is required to set it up: | | |A 'snowpack' step allows the workflow user to add a snowpack description in narrative form. The following information is required to set it up: |
| | *A box is provided so you can set the name of the snowpack step. | | *A box is provided so you can set the name of the snowpack step. |
| − | {{Note|A snowpack description is not the same as a snowpack observation. Snowpack descriptions are narrative interpretations of snowpack structure. Snowpack descriptions are not visible in the infoex report until you specify their inclusion. See ‘Customizing a report’.}} | + | {{Note|A snowpack description is not the same as a snowpack observation. Snowpack descriptions are narrative interpretations of snowpack structure. Snowpack descriptions are not visible in the infoex report until you specify their inclusion. See [[Specifying the tables to be included in an InfoEx report]].}} |
| | |- | | |- |
| | |class="StepNum" | Observation: | | |class="StepNum" | Observation: |
Revision as of 17:52, 28 October 2013
| REQUIREMENTS |
| Permission |
Operation administrator and higher |
| Connectivity |
Online and partial offline |
This document describes how to create a workflow in the infoex system.
Background
A workflow links together user-specified tasks into a logical order so that users can repeatedly move through the same steps.
Creating a workflow consists of two main tasks:
- Defining the workflow name and choosing its general features
- Adding at least one workflow step
Step-by-step description
| 1.
|
login to the infoEx system with an account that has Operation Administrator privileges.
|
| 2.
|
if you are enabled in more than one operation you must select an operation on the first screen after logging in.
|
| 3.
|
TASK 1: Create a new workflow
| a.
|
Go to the ‘workflows’ selection in the main menu and select ‘manage work flow definitions’. This will take you to the ‘Manage Workflows’ page
|
| b.
|
You are now presented with two headings: ‘Workflows’ and ‘Add Step’. To create a new workflow select ‘add’ under ‘Workflow’. The ‘Add Workflow’ pop-up window appears.
|
| c.
|
In the ‘Add Workflow’ pop-up window enter the following information for the new workflow:
- Name: A meaningful name of the workflow such as: ‘AM Guide Meeting’
- Include Summary: Select this check box if you want a summary screen at the end of the workflow
- Progressive Workflow: Select this check box to ensure that the steps of the workflow are presented in order (i.e. no steps are skipped). If this does not matter, leave this option unchecked.
| NOTE |
Once the workflow steps have been completed you can review and edit steps in any order. |
- Locations: Associate the workflow with a location or combination of locations from your location catalogue.
| NOTE |
Click on the text box to get a dropdown with your entire location catalogue. To filter the dropdown start typing the name of the location |
| NOTE |
If no locations are visible an operation administrator must first create locations using the location catalogue selection under the menu (see help documentation for ‘How to add a location to your operation’) |
|
| d.
|
Click on the OK button at the bottom right of the ‘Add New Workflow’ window to save the workflow settings and close the pop-up window. The new workflow has now been created and is visible in the dropdown menu under ???
|
|
| 4.
|
TASK 2: Add a step to the new workflow.
| a.
|
Ensure that the new workflow you want to add a step to is the one listed under ‘Workflow’. If it is not, use the dropdown list to select the new workflow.
|
| b.
|
Select add under steps. The ‘Add New Step’ popup window appears .
|
| c.
|
In the ‘Add New Step’ popup window enter the following information:
- Name: A meaningful name for the step
- Type:
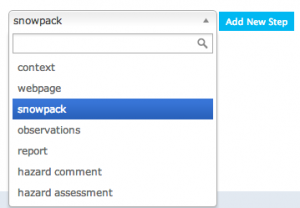 Fig. 1: Workflow Step Types - Context
- Webpage
- Snowpack
- Observation
- Report
- Hazard comment
- Hazard assessment
|
| d.
|
Each step type requires you to enter specific baseline information for that step. The different step types, their purpose, and the information they require are listed below.
|
|
Details of: Types of workflow steps and the information required to set them up
| Context:
|
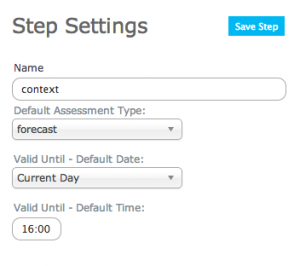 Fig. 2: Workflow 'context' settings - The name of the context step (frequently 'Context for [workflow name]'). This provides a name for this step as the user moves through the workflow.
- The type of workflow. Only two selections are possible: Nowcast (the context refers to conditions at the present moment); Forecast (the context refers to future conditions).
- The date of validity (This is the future date that the workflow is valid until). The default future date is selected by the person who creates the workflow and applies to all workflows of this type.
- The time of vailidity (This is the time of day on the future date that the workflow is valid until.) The default time is selected by the person who creates the workflow.
| NOTE |
All context steps will automatically provide a field to record when the workflow was run and who attended the workflow session. |
| NOTE |
The date and time of validity can be changed when the workflow is run. |
|
| Webpage:
|
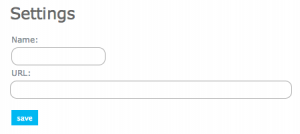 Fig. 3: Workflow 'webpage' settings - A box is provided so you can set the name of the website step. This provides a meaningful name for this step as the user moves through the workflow.
- The url of the website to visit
| NOTE |
Currently you cannot use Google websites. This includes Google Search and YouTube |
|
| Snowpack:
|
A 'snowpack' step allows the workflow user to add a snowpack description in narrative form. The following information is required to set it up:
- A box is provided so you can set the name of the snowpack step.
| NOTE |
A snowpack description is not the same as a snowpack observation. Snowpack descriptions are narrative interpretations of snowpack structure. Snowpack descriptions are not visible in the infoex report until you specify their inclusion. See Specifying the tables to be included in an InfoEx report. |
|
| Observation:
|
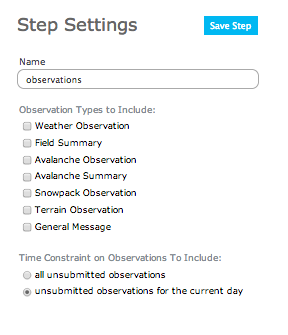 Fig. 4: Workflow 'observation' settings - A box is provided so you can set the name of the observation step.
- A list of 'observation types to include' is provided. Select the desired combination of options for the observation you want to make as part of the workflow.
- Select the 'time constraint on observations to include'. You can submit all unsubmitted observations for the operation, or limit submission to today's observations only.
| NOTE |
You may wish to limit submissions to today's date if there is a possibility that a saved workflow has stale data from a previous day |
|
| Reports:
|
A 'report' step allows you to view a customized infoex report as part of the workflow. The following information is required to set it up.
- A box is provided so you can set the name of the Report step.
- A dropdown list provides the list of predefined reports that you may select for viewing.
| NOTE |
You can only select reports that have been previously defined. See: 'Customizing reports' |
| ISSUE |
Currently the list available reports does not populate the dropdown list
NO WORKAROUND
JIRA: -952 (Date) |
|
| Hazard Comment:
|
A 'hazard comment' step allows you to create and add a comment about avalanche hazard in narrative form to your workflow. The following information is required to set it up:
- A box is provided so you can set the name of the hazard comment step.
|
| Hazard Assessment:
|
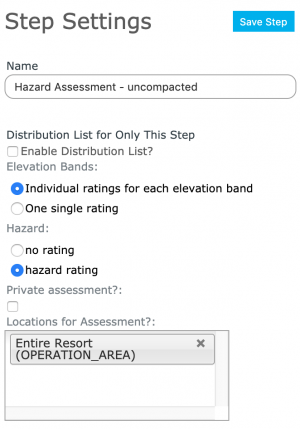 Fig. 5: Workflow 'hazard assessment' settings - A box is provided so you can set the name of the 'hazard assessment' step.
- You may select to assess hazard for one or three elevation bands.
- You may choose to rate stability, hazard, both, or neither.
|
Related documents
- How to add a location to your operation.
- Customizing a report
Functionality tested by


