Difference between revisions of "Executing a workflow instance"
Jump to navigation
Jump to search
(→Functionality tested by) |
|||
| Line 1: | Line 1: | ||
__NOTOC__ | __NOTOC__ | ||
| − | {{Requirements|UserLevel= | + | {{Requirements|UserLevel=Submission Moderator and higher|Connectivity=Online and offline}} |
| − | This document describes how to | + | This document describes how to start a [[Definitions#WorkflowInstance|workflow instance]] from an existing [[Definitions#WorkflowTemplate|workflow template]] during regular operations. |
==Background== | ==Background== | ||
| − | A workflow links together user-specified tasks into a logical order so that users can repeatedly move through the same steps. | + | A workflow links together user-specified tasks into a logical order so that users can repeatedly move through the same steps. See the following documents for more background information on workflows: |
| + | * [[Workflow overview]] | ||
| + | * [[Creating a workflow template]] | ||
| − | + | Executing a workflow instance involves three main steps: | |
| − | + | # Selecting and initiating the desired workflow | |
| − | + | # Completing the steps included in the workflow | |
| − | + | # Saving and sharing the results of a workflow with the InfoEx community | |
| − | |||
| − | |||
| − | |||
| − | |||
| − | |||
| − | |||
| − | |||
| − | |||
| − | |||
| − | |||
| − | |||
| − | |||
| − | |||
| − | |||
| − | |||
| − | |||
| − | |||
| − | |||
| − | |||
| − | |||
| − | Executing a workflow involves | ||
| − | |||
| − | |||
| − | + | ==Step-by-step description== | |
| − | |||
| − | + | ===Step 1: Selecting and initiating the desired workflow=== | |
| − | |||
| − | == | ||
| − | |||
| − | |||
| − | == | ||
{|class="TblSteps" | {|class="TblSteps" | ||
|- | |- | ||
|class="StepNum" | 1. | |class="StepNum" | 1. | ||
| − | | | + | |[[File:WorkflowMenuStartNew.png|300px|thumb|right|Fig. 1: Workflow menu for starting a new workflow instance.]]From the 'Workflows' menu select the workflow you want to execute and click on 'start new'. You need to be a Submission Moderator to have access to this menu item. The system will now load the necessary information for executing the chosen workflow. |
| + | {{Note|It is desirable to have a live internet connection when you initiate a workflow. This allows the system to pre-populate the fields of the [[Snowpack module]], [[Hazard assessment module]] and [[Hazard comment module]] with the information from the last time a workflow was submitted for the location(s) associated with the chosen workflow.}} | ||
| + | {{Note|It is possible to initiate a workflow instance completely offline, but it will be completely empty and you will have to start your assessments completely from scratch.}} | ||
|- | |- | ||
|class="StepNum" | 2. | |class="StepNum" | 2. | ||
| − | + | |[[File:WorkflowProgressSteps.png|300px|thumb|right|Fig. 2: Workflow progress]]After aftert the necessary information has been loaded, the workflow will begin with the first step. The list of workflow steps is presented at the top of the workflow screen below the workflow title. | |
| − | + | ||
| − | + | ||
| − | |||
| − | |||
| − | |||
| − | |[[File:WorkflowProgressSteps.png|300px|thumb|right|Fig. | ||
|- | |- | ||
|class="StepNum" | 5. | |class="StepNum" | 5. | ||
Revision as of 11:05, 31 December 2013
| REQUIREMENTS | |
| Permission | Submission Moderator and higher |
| Connectivity | Online and offline |
This document describes how to start a workflow instance from an existing workflow template during regular operations.
Background
A workflow links together user-specified tasks into a logical order so that users can repeatedly move through the same steps. See the following documents for more background information on workflows:
Executing a workflow instance involves three main steps:
- Selecting and initiating the desired workflow
- Completing the steps included in the workflow
- Saving and sharing the results of a workflow with the InfoEx community
Step-by-step description
Step 1: Selecting and initiating the desired workflow
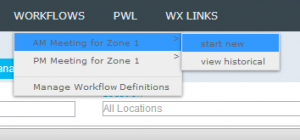
| 1. | From the 'Workflows' menu select the workflow you want to execute and click on 'start new'. You need to be a Submission Moderator to have access to this menu item. The system will now load the necessary information for executing the chosen workflow.
| ||||
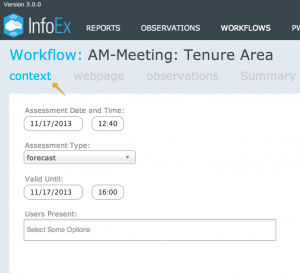
| 2. | After aftert the necessary information has been loaded, the workflow will begin with the first step. The list of workflow steps is presented at the top of the workflow screen below the workflow title.
| ||||
| 5. | To move between steps use the controls at the top right of the workflow area (see Figure 2).
| ||||
| 6. | At any time you can select Discard & Exit from the workflow controls (see Figure 2) this will delete all trace of the workflow execution and no information will be submitted to the infoEx server. | ||||
| 7. | At any time you can select Save & Exit from the workflow controls (see Figure 2) this will save a local copy of the workflow execution to date as well as share the saved information between all enabled local computers within an operation. However, no information will be shared with the infoEx server. | ||||
| 8. | When the Submit button activates by turning blue Submit you may submit all entered information to the infoEx Server
|
Related documents
Functionality tested by
- Nov. 17, 2013: John Kelly / Training / Version 3.1.0

