Difference between revisions of "Entering and submitting observations (multiple computers)"
(→Entering observations (all user levels)) |
(→Submitting observations (Submission moderator or higher)) |
||
| (17 intermediate revisions by 2 users not shown) | |||
| Line 2: | Line 2: | ||
{{Requirements|UserLevel=All user levels with restrictions|Connectivity=Online and Offline}} | {{Requirements|UserLevel=All user levels with restrictions|Connectivity=Online and Offline}} | ||
| − | This document describes the process for entering and submitting observations to | + | This document describes the process for entering and submitting observations to InfoEx with a multiple computer setup. |
==Background== | ==Background== | ||
| Line 15: | Line 15: | ||
#* Only users with users with [[Description of user levels|submission moderators]] permissions or higher can retrieve and review observations shared by other users of your operation. | #* Only users with users with [[Description of user levels|submission moderators]] permissions or higher can retrieve and review observations shared by other users of your operation. | ||
#* You need to be online to retrieve the shared observations and while editing them. | #* You need to be online to retrieve the shared observations and while editing them. | ||
| − | # '''Submitting observations to | + | # '''Submitting observations to InfoEx''' |
| − | #* Only users with [[Description of user levels|submission moderators]] permissions or higher can finally submit the reviewed observations to | + | #* Only users with [[Description of user levels|submission moderators]] permissions or higher can finally submit the reviewed observations to InfoEx |
| − | #* You need to be online to submit the observations to | + | #* You need to be online to submit the observations to InfoEx. |
The following section describes the steps included in all four phases in detail. | The following section describes the steps included in all four phases in detail. | ||
| Line 29: | Line 29: | ||
|- | |- | ||
|class="StepNum" | 2. | |class="StepNum" | 2. | ||
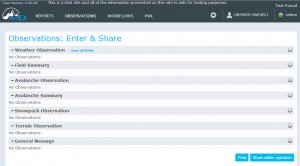
| − | |[[File:ObsTableMultiSubMod.png|300px|thumb|right|Fig. 2: Observation summary table for submission moderator in | + | |[[File:ObsTableMultiSubMod.png|300px|thumb|right|Fig. 2: Observation summary table for submission moderator in multiple computer mode]] This will open an observation overview table that lists all of the supported observation types (Fig. 2). |
|- | |- | ||
|class="StepNum" | 3. | |class="StepNum" | 3. | ||
| Line 40: | Line 40: | ||
{{Note|See [[Customizing observation entry forms]] for details on how to customize your observation entry forms|NoteWithImage}} | {{Note|See [[Customizing observation entry forms]] for details on how to customize your observation entry forms|NoteWithImage}} | ||
| − | |- | + | |- |
|class="StepNum" | 5. | |class="StepNum" | 5. | ||
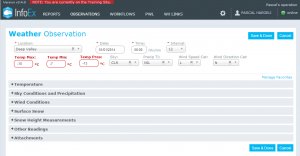
| − | |[[File: | + | |[[File:WxObsValidationError.png|300px|thumb|right|Fig. 4: Weather observation form with validation error]] If a field is not filled out correctly (e.g., mandatory field is missing, maximum temperature is lower than minimum temperature), you will get a validation error message and you will have to fix the issue before you can save the observation. The fields that cause the validation error are highlighted with a red boarder and a red label (Fig. 4). If you cannot see the validation error in your favourites section at the top of the form, open all of the collapsed sections in the lower part of the form and you will find the field that is causing the issue. |
| + | {{Note|One of the most common validation issue is a weather observation that has an HST value, but the HST CLEARED DATE or HST CLEARED TIME fields are not filled out. BOTH of these fields are mandatory when submitting an HST or HSTW value. This is the reason why the HST CLEARED DATE or HST CLEARED TIME fields where dragged into the favourites section when the you move any HST field in there.|NoteWithImage}} | ||
|- | |- | ||
|class="StepNum" | 6. | |class="StepNum" | 6. | ||
| − | | | + | |[[File:ObsTableWxMultiUser.png|300px|thumb|right|Fig. 5: Observation overview table for user in multi computer mode with a single weather observations]] This will get you back to the observation overview table with the entered observation showing in the appropriate table (Fig. 5). |
|- | |- | ||
|class="StepNum" | 7. | |class="StepNum" | 7. | ||
| + | |Repeat steps 3 to 6 until you have entered all of your observations. | ||
| + | |- | ||
| + | |class="StepNum" | 8. | ||
|Edit your observations as required. | |Edit your observations as required. | ||
* Click on [[File:ButtonEdit.png]] at the right end of an existing observation row of a to edit it. | * Click on [[File:ButtonEdit.png]] at the right end of an existing observation row of a to edit it. | ||
| Line 55: | Line 59: | ||
|} | |} | ||
| − | {{Note|At this point, all the | + | {{Note|At this point, all the observations that you have entered are stored in the cache of your Google Chrome browser on your local machine. These observations will persist even if you completely close the browser or even turn off your computer completely.|NoteNoImage}} |
| − | {{Note|All of these | + | {{Note|All of these steps can be completed regardless whether you are online and offline. See the top right corner of the application for view your online status.}} |
===Sharing your observations within your operation (all user levels)=== | ===Sharing your observations within your operation (all user levels)=== | ||
| Line 65: | Line 69: | ||
|- | |- | ||
|class="StepNum" | 2. | |class="StepNum" | 2. | ||
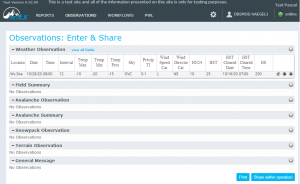
| − | |[[File:ObsTableWxMultiUser.png|300px|thumb|right|Fig. | + | |[[File:ObsTableWxMultiUser.png|300px|thumb|right|Fig. 6: Observation overview table for submission moderator in multiple computer mode with a single weather observation]] To share your observations within your operation, click on {{ButtonBlue|Share within operation}} (Fig. 6). |
| + | |||
| + | You will receive a series of system messages confirming the upload of the observations. | ||
| − | + | Once the observations have been uploaded, they will be removed from your local cache and disappear from the observation overview tables. | |
|- | |- | ||
|class="StepNum" | 3. | |class="StepNum" | 3. | ||
|If you are not connected to the Internet (see top right corner for status) when you click on the {{ButtonBlue|Share within operation}} button, you will get a system message saying that your are currently offline, but that the observations automatically will be submitted as soon as you are online again. The observations will remain in the observation overview screen until they have been uploaded to the server. | |If you are not connected to the Internet (see top right corner for status) when you click on the {{ButtonBlue|Share within operation}} button, you will get a system message saying that your are currently offline, but that the observations automatically will be submitted as soon as you are online again. The observations will remain in the observation overview screen until they have been uploaded to the server. | ||
|} | |} | ||
| + | |||
| + | ===Reviewing observation that have been shared by your team (Submission moderator or higher)=== | ||
| + | {|class="TblSteps" | ||
| + | |- | ||
| + | |class="StepNum" | 1. | ||
| + | |[[File:ObsMenuMultiSubMod.png|300px|thumb|right|Fig. 7: Observation menu for submission moderator in multiple computer mode]] Click on the 'OBSERVATION' menu and select 'Review & Submit' (Fig. 7). Only user accounts with the permission of a Submission Moderator have the necessary permission level to access this menu item. | ||
| + | |- | ||
| + | |class="StepNum" | 2. | ||
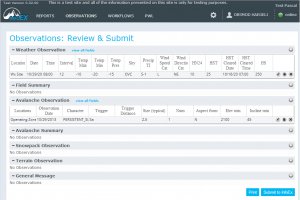
| + | |[[File:ObsTableMultiReview.png|300px|thumb|right|Fig. 8: Observation summary table for submission moderator in multiple computer mode for review and submission]] This will open an observation overview table that lists all of the supported observation types (Fig. 8) similar to the observation overview table under 'Enter & Share'. | ||
| + | |||
| + | At this point, all of the observations that have been entered and shared by your team members will be retrieved from the server and displayed in the overview tables. | ||
| + | {{Note|You need to be online to retrieve the observations that have been shared by your team members and for the rest of the editing and submission process.|NoteWithImage}} | ||
| + | |- | ||
| + | |class="StepNum" | 3. | ||
| + | |Edit the shared observations as required. | ||
| + | * Click on [[File:ButtonEdit.png]] at the right end of an existing observation row of a to edit it. | ||
| + | * Click on [[File:ButtonCopy.png]] at the right end of an existing observation row to clone it. | ||
| + | {{Note|This can be a useful tool for entering multiple observations (e.g., avalanche observations) that have similar characteristics. Once you entered the first observation, you can simply clone it. This will open a new observation entry screen prefilled with the values of the previously entered observation. You can then change whatever fields are different and click on {{ButtonBlue|Save & Done}} to save the observation.}} | ||
| + | * Click on [[File:ButtonDelete.png]] at the right end of an existing observation row to delete it. | ||
| + | |- | ||
| + | |class="StepNum" | 4. | ||
| + | |Add additional observations as required. See [[#Entering observations (all user levels)|Entering observations (all user levels)]] for details on how to enter observations. | ||
| + | |} | ||
| + | |||
| + | ===Submitting observations (Submission moderator or higher)=== | ||
| + | {|class="TblSteps" | ||
| + | |- | ||
| + | |class="StepNum" | 1. | ||
| + | |[[File:ObsTableMultiReview.png|300px|thumb|right|Fig. 9: Observation summary table for submission moderator in multiple computer mode for review and submission]] To submit all of your observations to InfoEx, click on {{ButtonBlue|Submit to InfoEx}} in the bottom right corner of the observation overview table in the 'Review & Submit' screen (Fig. 9). | ||
| + | |||
| + | You will receive a series of system messages confirming the upload of the observations. | ||
| + | |||
| + | Once the observations have been uploaded, they will be removed from your local cache and disappear from the observation overview tables. | ||
| + | |||
| + | {{Note|Once observations have been submitted to InfoEx, they can only be deleted by special request to CAA staff explaining the reason for deletion.|NoteWithImage}} | ||
| + | |} | ||
| + | |||
| + | ==Related documents== | ||
| + | {{PagesObsEntry}} | ||
| + | |||
| + | ==Functionality tested by== | ||
| + | * Dec. 23: Pascal Haegeli | ||
| + | |||
| + | [[Category:Super User]][[Category:Operation Administrator]][[Category:Submission Moderator]][[Category:User]][[Category:Offline]][[Category:Observations]][[Category:Version 3.4.0]] | ||
Latest revision as of 10:45, 19 March 2017
| REQUIREMENTS | |
| Permission | All user levels with restrictions |
| Connectivity | Online and Offline |
This document describes the process for entering and submitting observations to InfoEx with a multiple computer setup.
Background
The process of entering and submitting observation with a multiple computer setup has four distinct phases:
- Entering observations
- All users of an operation have the permissions to enter observations
- Observations can be entered without connectivity
- Sharing observations within your operation
- All users of an operation have the permissions to share observations
- Whereas it is possible to click on the share button while being offline, the actual sharing requires connectivity
- Reviewing observation that have been shared by your team
- Only users with users with submission moderators permissions or higher can retrieve and review observations shared by other users of your operation.
- You need to be online to retrieve the shared observations and while editing them.
- Submitting observations to InfoEx
- Only users with submission moderators permissions or higher can finally submit the reviewed observations to InfoEx
- You need to be online to submit the observations to InfoEx.
The following section describes the steps included in all four phases in detail.
Step-by-step description
Entering observations (all user levels)
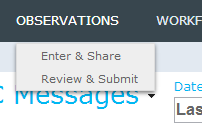
| 1. | Click on the 'OBSERVATION' menu and select 'Enter & Submit' (Fig. 1). All user accounts associated with your operation have the necessary permission level to access this menu item. | ||
| 2. | This will open an observation overview table that lists all of the supported observation types (Fig. 2). | ||
| 3. | Click on the | ||
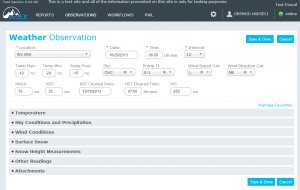
| 4. | Enter all the information you have collected for your observation. Ensure that you complete all of the required fields, which are highlighted with a red * (Fig. 3).
Click on Save & Done to save the the observation to the local computer.
| ||
| 5. | If a field is not filled out correctly (e.g., mandatory field is missing, maximum temperature is lower than minimum temperature), you will get a validation error message and you will have to fix the issue before you can save the observation. The fields that cause the validation error are highlighted with a red boarder and a red label (Fig. 4). If you cannot see the validation error in your favourites section at the top of the form, open all of the collapsed sections in the lower part of the form and you will find the field that is causing the issue.
| ||
| 6. | This will get you back to the observation overview table with the entered observation showing in the appropriate table (Fig. 5). | ||
| 7. | Repeat steps 3 to 6 until you have entered all of your observations. | ||
| 8. | Edit your observations as required.
|
| NOTE | At this point, all the observations that you have entered are stored in the cache of your Google Chrome browser on your local machine. These observations will persist even if you completely close the browser or even turn off your computer completely. |
| NOTE | All of these steps can be completed regardless whether you are online and offline. See the top right corner of the application for view your online status. |
Sharing your observations within your operation (all user levels)
| 1. | Follow the steps described under Entering observations (all user levels) to enter observations or edit observations that have been entered on the same computer by other staff members. |
| 2. | To share your observations within your operation, click on Share within operation (Fig. 6).
You will receive a series of system messages confirming the upload of the observations. Once the observations have been uploaded, they will be removed from your local cache and disappear from the observation overview tables. |
| 3. | If you are not connected to the Internet (see top right corner for status) when you click on the Share within operation button, you will get a system message saying that your are currently offline, but that the observations automatically will be submitted as soon as you are online again. The observations will remain in the observation overview screen until they have been uploaded to the server. |
| 1. | Click on the 'OBSERVATION' menu and select 'Review & Submit' (Fig. 7). Only user accounts with the permission of a Submission Moderator have the necessary permission level to access this menu item. | ||
| 2. | This will open an observation overview table that lists all of the supported observation types (Fig. 8) similar to the observation overview table under 'Enter & Share'.
At this point, all of the observations that have been entered and shared by your team members will be retrieved from the server and displayed in the overview tables.
| ||
| 3. | Edit the shared observations as required.
| ||
| 4. | Add additional observations as required. See Entering observations (all user levels) for details on how to enter observations. |
Submitting observations (Submission moderator or higher)
| 1. | To submit all of your observations to InfoEx, click on Submit to InfoEx in the bottom right corner of the observation overview table in the 'Review & Submit' screen (Fig. 9).
You will receive a series of system messages confirming the upload of the observations. Once the observations have been uploaded, they will be removed from your local cache and disappear from the observation overview tables.
|
Related documents
[1] Click to watch a help video
[2] Click to watch a help video
Functionality tested by
- Dec. 23: Pascal Haegeli
