Difference between revisions of "Adding locations to the location catalog"
Jump to navigation
Jump to search
(→Step-by-step description) |
|||
| Line 10: | Line 10: | ||
|- | |- | ||
|class="StepNum" | 1. | |class="StepNum" | 1. | ||
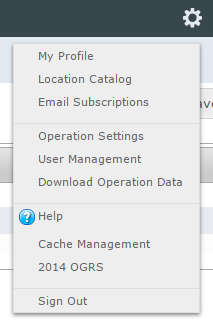
| − | |[[File:AdminMenuOperationAdministrator.png|300px|thumb|right|Fig. 1: Administration menu for operation administrator]] | + | |[[File:AdminMenuOperationAdministrator.png|300px|thumb|right|Fig. 1: Administration menu for operation administrator]] Select the Location Catalog from the administration menu (cog wheel) in the top left corner of the screen (Fig. 1). To have access to this menu item, you need to be either an operation administrator or a super user. |
| − | Select the Location Catalog from the administration menu (cog wheel) in the top left corner of the screen (Fig. 1). To have access to this menu item, you need to be either an operation administrator or a super user. | ||
|- | |- | ||
|class="StepNum" | 2. | |class="StepNum" | 2. | ||
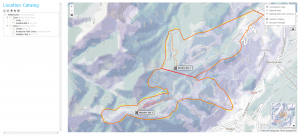
| − | |[[File:LocationCataolgScreen.png|300px|thumb|right|Fig. 2: Location catalog screen]] | + | |[[File:LocationCataolgScreen.png|300px|thumb|right|Fig. 2: Location catalog screen]] This will get you to the location catalog screen of the application (Fig. 2). Please note that depending on your connectivity and the size of your location catalog, it might take a while to start Google Earth and load your entire location catalog. The location catalog screen shows your location hierarchy tree on the right and a Google Earth map on the right. |
| − | This will get you to the location catalog screen of the application (Fig. 2). Please note that depending on your connectivity and the size of your location catalog, it might take a while to start Google Earth and load your entire location catalog. The location catalog screen shows your location hierarchy tree on the right and a Google Earth map on the right. | ||
{{Issue|The system currently does not provide the user with any progress information about the loading of the location catalog.|IssueWithImage|834|Aug. 26, 2013}} | {{Issue|The system currently does not provide the user with any progress information about the loading of the location catalog.|IssueWithImage|834|Aug. 26, 2013}} | ||
|- | |- | ||
| Line 23: | Line 21: | ||
|- | |- | ||
|class="StepNum" | 4. | |class="StepNum" | 4. | ||
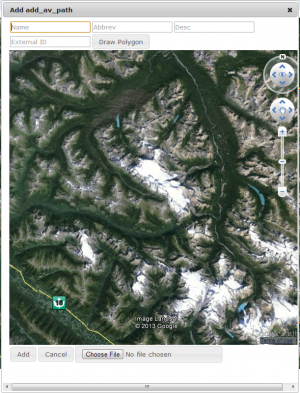
| − | |[[File:PopupWindowAddingLocationBlank.png|300px|thumb|right|Fig. 3: Blank popup window for adding a location]] | + | |[[File:PopupWindowAddingLocationBlank.png|300px|thumb|right|Fig. 3: Blank popup window for adding a location]] Right click on the parent location of the new location and select New and the desired location type from the menu. See [[Location hierarchy]] for a detailed list on what locations can be created under what types of locations. This will open a pop-up window with a second Google Earth map (Fig. 3). |
| − | Right click on the parent location of the new location and select New and the desired location type from the menu. See [[Location hierarchy]] for a detailed list on what locations can be created under what types of locations. This will open a pop-up window with a second Google Earth map (Fig. 3). | ||
{{Issue|Sometime the menu options in the location tree do not seem to be enabled.<br/>''Workaround'': Leave the location catalog page and return to it or completely restart the browser. |IssueWithImage|841|Sept. 22, 2013}} | {{Issue|Sometime the menu options in the location tree do not seem to be enabled.<br/>''Workaround'': Leave the location catalog page and return to it or completely restart the browser. |IssueWithImage|841|Sept. 22, 2013}} | ||
{{Issue|The second Google Earth instance does not always load properly.<br/>''Workaround'': Restart the browser and log back into the system. |IssueWithImage|836|Sept. 22, 2013}} | {{Issue|The second Google Earth instance does not always load properly.<br/>''Workaround'': Restart the browser and log back into the system. |IssueWithImage|836|Sept. 22, 2013}} | ||
Revision as of 15:08, 21 October 2013
| REQUIREMENTS | |
| Permission | Operation Administrator or higher |
| Connectivity | Online only |
This document describes how to add locations to the location catalog of your operation.
Step-by-step description
| 1. | Select the Location Catalog from the administration menu (cog wheel) in the top left corner of the screen (Fig. 1). To have access to this menu item, you need to be either an operation administrator or a super user. | ||||
| 2. | This will get you to the location catalog screen of the application (Fig. 2). Please note that depending on your connectivity and the size of your location catalog, it might take a while to start Google Earth and load your entire location catalog. The location catalog screen shows your location hierarchy tree on the right and a Google Earth map on the right.
| ||||
| 3. | Expand the location hierarchy tree on the right as required by clicking on the little plus (+) signs left of locations that contain other locations.
| ||||
| 4. | Right click on the parent location of the new location and select New and the desired location type from the menu. See Location hierarchy for a detailed list on what locations can be created under what types of locations. This will open a pop-up window with a second Google Earth map (Fig. 3).
| ||||
| 5. | Enter the following information for the new location into the fields at the top of the pop-up window:
| ||||
| 6. | Add an appropriate geometry to the location. See Location types and symbology for details on the supported geometries for the different location types.
There are currently two options for adding geometries to a location:
| ||||
| 7. | Click on Add to add the new location to the location tree of the operation. This will close the pop-up window and add the new location to the location tree.
|
Related documents
- How to delete locations from the location catalog
- How to edit locations of your operation
- How to create a hierarchy among your locations
- How to search for a location in your location catalog
Functionality tested by
- Sept. 22: Pascal Haegeli / QA Server / Test Version 0.27.00)


