Difference between revisions of "Entering and submitting observations (single computer)"
Jump to navigation
Jump to search
(→Entering observations) |
(→Entering observations) |
||
| Line 40: | Line 40: | ||
|- | |- | ||
|class="StepNum" | 6. | |class="StepNum" | 6. | ||
| − | |Repeat steps 3 to 5 until | + | |Repeat steps 3 to 5 until you have entered all of your observations. |
| − | |||
|} | |} | ||
| + | {{Note|If you are are user with general user permissions in the Infoex system, your job is completed!}} | ||
===Submitting observations=== | ===Submitting observations=== | ||
Revision as of 11:51, 29 October 2013
| REQUIREMENTS | |
| Permission | All user levels with restrictions |
| Connectivity | Online and Offline |
This document describes the process for entering and submitting observations with a single computer setup to the InfoEx.
Background
The process of entering and submitting observation with a single computer setup has two distinct phases:
- Entering observations
- All users of an operation have the permissions to enter observations
- Observations can be entered without connectivity
- Submitting observations to the InfoEx
- Only users with observation administrators permissions or higher can submit the observations that have been entered on a computer to the InfoEx
- Whereas it is possible to click on the submit button while being offline, the actual submission to the InfoEx requires connectivity
The following section describes the steps included in both of these phases in detail.
Step-by-step description
Entering observations
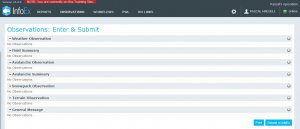
| 1. | Click on the 'OBSERVATION' menu and select 'Enter & Submit' (Fig. 1). All user accounts associated with your operation have the necessary permission level to access this menu item. | ||
| 2. | This will open an observation overview table that lists all of the supported observation types (Fig. 2) | ||
| 3. | Click on the | ||
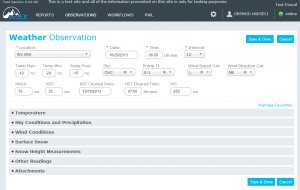
| 4. | Enter all the information you have collected for your observation. Ensure that you complete all of the required fields, which are highlighted with a red * (Fig. 3).
Click on Save & Done to save the the observation to the local computer.
| ||
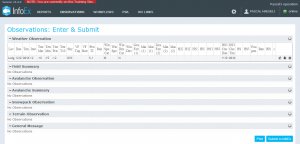
| 5. | This will get you back to the observation overview table with the entered observation showing in the appropriate table (Fig. 4). | ||
| 6. | Repeat steps 3 to 5 until you have entered all of your observations. |
| NOTE | If you are are user with general user permissions in the Infoex system, your job is completed! |
Submitting observations
| 1. | Description of first step. |
| 2. | Description of second step. |
| 3. | ... |
Related documents
- Entering and submitting observations overview
- Specifying the operational setting for entering and submitting observations
- Entering and submitting observations (multiple computers)
Functionality tested by
- Oct. 29: Pascal Haegeli / QA Server / Test Version 0.32.00


