Editing a workflow template
Jump to navigation
Jump to search
| REQUIREMENTS | |
| Permission | Operation administrator and higher |
| Connectivity | Online only |
This document describes how to edit an existing workflow template in the InfoEx system.
Background
A workflow template links together user-specified tasks into a logical order so that users can repeatedly move through the same steps. Workflow templates are custom designed by each operation and internally managed by users of the operation with Operation Administrator permissions. This document provides information on how to edit a workflow template that has been previously created.
Step-by-step description
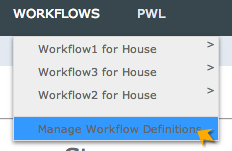
| 1. | Click on 'Manage Workflow Definitions' under the WORKFLOWS item in the main menu bar (Fig. 1). | ||
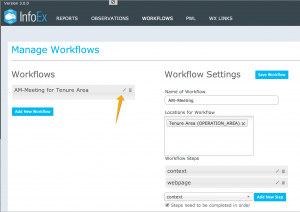
| 2. | Find the workflow that you want to edit in the list of existing workflow templates under the 'Workflows' section title and click on the the | ||
| 3. | To edit the name for your workflow, enter a new name into the 'Name of Workflow' field. | ||
| 4. | To change the location association of your workflow, either click on the | ||
| 5. | To add a new workflow step, see Adding steps to the workflow template for more details. | ||
| 5. | To edit the settings of an existing workflow step, click on the
| ||
| 7. | To delete a workflow step from your template, click on the | ||
| 8. | The change whether the steps in your workflow need to be completed in order, check (strict order enforced) or uncheck (order not enforced) check checkbox at the bottom of the 'Workflow Steps' section. | ||
| 9. | Once you have completed your edits, click on Save Workflow in the central panel to save changes to the workflow template permanently.
|
Related documents
Functionality tested by
- Dec. 24, 2013: Pascal Haegeli

