Difference between revisions of "Webpage module"
| (3 intermediate revisions by one other user not shown) | |||
| Line 4: | Line 4: | ||
[[File:WebpagePopup.png|300px|thumb|right|Fig. 2: Webpage workflow module settings]] | [[File:WebpagePopup.png|300px|thumb|right|Fig. 2: Webpage workflow module settings]] | ||
| − | This document describes the functionality of the 'webpage' workflow module and how to | + | This document describes the functionality of the 'webpage' workflow module and how to configure it. |
'''Required permissions:''' | '''Required permissions:''' | ||
| Line 34: | Line 34: | ||
* '''URL'''<br/>Full internet address of webpage to be included in the workflow including the protocol (e.g., 'http://www.google.com'). | * '''URL'''<br/>Full internet address of webpage to be included in the workflow including the protocol (e.g., 'http://www.google.com'). | ||
| + | |||
| + | ==<span style="color: #CC0000;">Information shared within the InfoEx</span>== | ||
| + | None of the activities done within this workflow module are shared within the InfoEx. | ||
==Other workflow modules== | ==Other workflow modules== | ||
Latest revision as of 12:53, 30 May 2017
| REQUIREMENTS | |
| Permission | Submission moderator and higher |
| Connectivity | Online only |
This document describes the functionality of the 'webpage' workflow module and how to configure it.
Required permissions:
- You need to be a Operation administrator to create a workflow template.
- You need to be a Submission moderator to initiate a workflow instance.
Required connectivity:
- You need to be online to create a new or edit an existing workflow template.
- You need to be online to read a webpage while executing a workflow instance.
Functionality
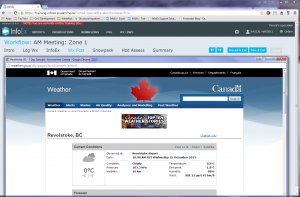
Including a webpage module step in a workflow allows you to view preset external web pages as part of the workflow. A typical example of a webpage to be included in a workflow is an online weather forecast product. While the webpage screen in the workflow itself shows the hyper-linked URL of the external webpage, the content of the external webpage is displayed in a separate browser window that is placed right in front of the workflow page of the InfoEx application. Subsequent webpages are all opened in the same browser window.
There are no restrictions on the number of webpage module steps that can be added to a workflow template.
No information about the webpages visited is submitted to the InfoEx server.
It is not possible to view the content of the external webpages without a live Internet connection.
| NOTE | With the webpage module, you can integrate Google Forms directly into your workflow. This allows you to completely customize your workflow and add any specialized entry forms for your hazard treatments or run lists to your workflow. |
Layout
The content of the external webpage is displayed in a separate browser window that is placed right in front of the workflow page of the InfoEx application (Fig. 1). This setup allows you to move the browser window to a separate screen if necessary.
Settings
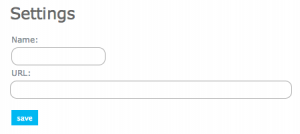
The webpage workflow module has the following settings (Fig. 2)
- Name
Name of the workflow step shown in the header of the workflow. It is recommended that you choose a short name (e.g., 'Wx Fcst' instead of 'Weather Forecast') to keep the navigation bar of the workflow as tidy as possible.
- URL
Full internet address of webpage to be included in the workflow including the protocol (e.g., 'http://www.google.com').
None of the activities done within this workflow module are shared within the InfoEx.
Other workflow modules
- Modules for entering data that is shared among InfoEx subscribers
- Modules for entering proprietary data
- Free form module
- Run list module (additional subscription required)
- Avalanche control module (additional subscription required)
- Modules for viewing information
- Other modules
Functionality tested by
- Dec. 24, 3013: Pascal Haegeli

