Avalanche control module
| REQUIREMENTS | |
| Permission | Submission Moderator and higher |
| Connectivity | Online and offline |
| NOTE | The avalanche control workflow module is not included in the regular InfoEx subscription fees. An additional subscription is required to use this functionality |
Required permissions:
- You need to be a Operation administrator to create a workflow template.
- You need to be a Submission moderator to initiate a workflow instance.
Required connectivity:
- You need to be online to create a new or edit an existing workflow template.
- If you are online when you initiate a workflow instance the fields will be prefilled from the last workflow instance with the same location(s). Once the workflow instance has been loaded, you can complete the workflow in an offline mode.
- You can initiate a workflow instance when you are offline, and the fields will be filled with the latest cached information on the computer. This will be up to date unless workflows have been submitted using other computers since you were last online on the computer you are currently using.
- If you submit whilst offline the workflow will be uploaded to the InfoEx server the next time you are online. WARNING: If the internet connection is lost whilst this is being done, the workflow will not be submitted and you will lose the data.
Functionality
The purpose of the avalanche control extension is to allow subscribers who regularly perform avalanche control to
- manage their control routes,
- assign routes to patrol teams during the daily forecasting routine, and
- have patrol leaders subsequently enter their control results efficiently
The use of explosives requires significant paperwork that can result in multiple data entries (e.g., explosives inventory, stabilization record, occurrence sheet, InfoEx submission). The avalanche control extension aims to streamline this process and provide a central data entry location for this information. The existing report functionality can then be used to create dynamic reports for various purposes. While the main target for this extension to the InfoEx application are ski areas that do avalanche control daily, it will also be useful for other industry segments, such as highway, railway, worksite and mechanized guiding avalanche safety programs.
The purpose of the avalanche control workflow step is to allow forecasters to plan the avalanche control missions for the day after they have assessed the current hazard. The main functionalities of the avalanche control workflow module include:
- Assigning patrollers to a control route
- Planning of explosive use
- Forecasting of expected results
You can have multiple avalanche control module steps in a workflow template.
Any workflow template with an avalanche control module step will automatically have a Workflow summary step added at the end of the workflow. This summary allows users to review their inputs before they are submitted.
It is possible to complete the avalanche control step in a workflow without internet connectivity.
Layout
The layout of the workflow module consists of a table the following elements (Fig. 1):
- Photo button
Provides access to the photos associated with the control route location from your location catalogue. The photos will open up in a separate browser window that can be moved to a second screen.
- Control Route
The full name of the control route as defined in the location catalog.
- Assigned Patrollers
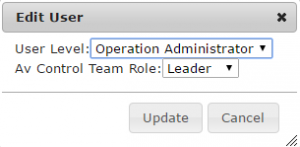
This multi-select dropdown list is taken from the User Management list of all the Avalanche Control Team Leaders and Team Members set up for your operation. Team Leaders are highlighted in the dropdown list with '(L)' after their name. Operations with an active Avalanche Control extension subscription can set-up Team Leaders and Members in Changing the permission level of an existing user of your operation (Fig. 2).
- Blaster of Record
If a single control Team Leader has been designated for this route he or she will automatically be selected as the Blaster of Record. If you have more than one Team Leader assigned then click the down arrow and select which will be the designated Blaster of Record.
- Num of shots
This is primarily available for planning purposes. Type the num of shots directly and/or use the up/down arrows at the right of the box. A total 'num of shots' for all the routes is updated in real time after the last control route.
- Forecasted Trigger/Size
An optional field - click here for details on how to configure it. The purpose of the field is to facilitate discussing conditions with control teams and for a forecast record that can be compared with the subsequent true control results to verify the forecast and can be used as a training tool.
- Comment
A field for including a short comment regarding the control route.
- History button
Provides access to a customized report template. While the generic template does not need to include any location filters, the report only shows observations associated for the specific location when accessed through this button.
Settings
There are two sets of configuration settings for the avalanche control extension. One of them is accessed via Operation Settings (from the cogwheel menu) and the other using Manage Workflow Definitions (from the Workflows menu). The Operation Settings only affects Control Route Avalanche Observation entry which is used to record results after field operations. The configuration in Manage Workflow Definitions only affects the Avalanche Control workflow module used for planning prior to field operations:
1) Avalanche Control configuration
The configuration for the avalanche control extension entry of results is done from the operation settings. See Avalanche Control Configuration for more details.
2) Avalanche Control workflow module settings
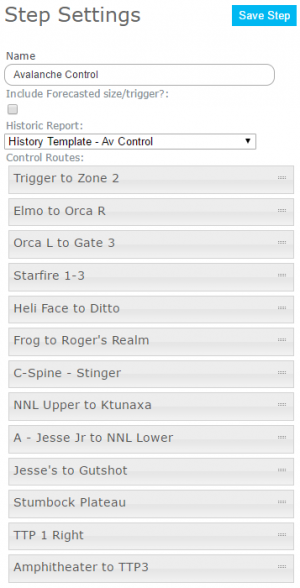
The avalanche control workflow module settings are completed each time the avalanche control module is included in a workflow. It has the following settings (Fig. 3):
- Name
Name of the workflow step shown in the header of the workflow. It is recommended that you choose a short name to keep the navigation bar of the workflow as tidy as possible.
- Include Forecasted size/trigger?
Check this box to include a free text field with this title in the workflow step.
- Historic report
Select the report template that should be associated with the history button of each control route location. The historic report will be automatically filtered to include the avalanche paths for the selected control route.
- Control routes
Specify the order of the control routes in the workflow step. To change the order of the control routes, click and hold the handle on the right of the grey bar (two horizontal dashes) and drag and drop to the desired location within the list.
All of the information entered in this workflow module is stored on the InfoEx server however it is proprietary information and not shared.
Other workflow modules
- Modules for entering data that is shared among InfoEx subscribers
- Modules for entering proprietary data
- Free form module
- Run list module (additional subscription required)
- Avalanche control module (additional subscription required)
- Modules for viewing information
- Other modules
Functionality tested by
- Nov. 6, 2014: Pascal Haegeli


