Difference between revisions of "Avalanche Control Configuration"
Jump to navigation
Jump to search
(→Other operational settings) |
|||
| Line 82: | Line 82: | ||
* [[Specifying the operational setting for entering and submitting observations]] | * [[Specifying the operational setting for entering and submitting observations]] | ||
* [[Specifying the status ratings for the run list module]] (additional subscription required) | * [[Specifying the status ratings for the run list module]] (additional subscription required) | ||
| − | |||
===Run list extension=== | ===Run list extension=== | ||
Revision as of 15:04, 24 April 2017
| REQUIREMENTS | |
| Permission | Operation Administrator and higher |
| Connectivity | Online only |
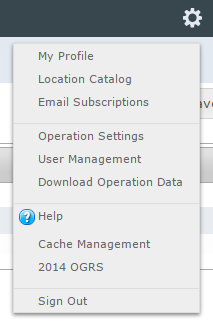
This page explains how to configure data entry for the avalanche control extension. See the avalanche control workflow module for configuration information for the avalanche control extension workflow module used for planning prior to field operations. The configuration is found in 'Operation Settings' accessed from the administration menu (cog wheel) (Fig. 1).
Background
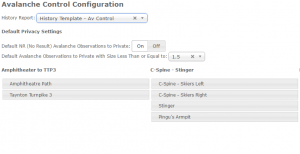
The avalanche control configuration (Fig. 2) allows you to specify the settings you would like to use for your avalanche control data entry.
However, before you can successfully configure your data entry for this extension you must ensure your location catalog is set up to allow this.
In your location catalog you need to do the following:
- Add your control routes. You can add photos to control route locations. These photos appear on the control route data entry screen for reference but CANNOT be drawn on using the photo overlay drawing functionality.
- Add your avalanche paths as child locations of your control routes, or drag and drop existing avalanche paths to be under their parent control route. Photos can be added to avalanche path locations and CAN be drawn on using the photo overlay drawing functionality during data entry.
Step-by-step description
| 1. | Select 'Operation Settings' from the administration menu (cog wheel) near the top right corner of the screen (Fig. 1). | ||
| 2. | Scroll down to the Avalanche Control Configuration section (Fig. 2). | ||
| 3. | Select the quick access report template you would like to use whilst entering control results via the avalanche control extension entry forms. | ||
| 4. | Set your default as to whether to share, or keep private, NR (no result) avalanche observations. For most operations setting the default to private will be the preferred option. Click on On to default to private or click on Off to default to shared. The button will turn white when selected. | ||
| 5. | Set your default (or do not enter any value for no default) for the largest size of avalanche that will default to private. Private observations will not appear in InfoEx reports for other operations but you can view non-shared observations by checking the box "Include Proprietary Data?". | ||
| 6. | All your control routes are shown in alphabetical order with their child Avalanche Paths below this. Drag and drop the avalanche paths to order them as you want them to appear in your avalanche control extension entry forms.
| ||
| 7. | The changes are immediately applied to your settings. You can move on to any other section of the application. |
Related documents
Other operational settings
- Specifying the operational setting for entering and submitting observations
- Specifying the status ratings for the run list module (additional subscription required)
Run list extension
Functionality tested by
- Nov. 8, 2014: Pascal Haegeli

