Difference between revisions of "Snowpack module"
(→Functionality) |
(→Settings) |
||
| Line 44: | Line 44: | ||
* '''Name'''<br/>Name of the workflow step shown in the header of the workflow. It is recommended that you choose a short name (e.g., 'Snpk' instead of 'Snowpack and PWLs') to keep the navigation bar of the workflow as tidy as possible. | * '''Name'''<br/>Name of the workflow step shown in the header of the workflow. It is recommended that you choose a short name (e.g., 'Snpk' instead of 'Snowpack and PWLs') to keep the navigation bar of the workflow as tidy as possible. | ||
| + | |||
| + | * '''Enable Distribution List'''<br/>Select this checkbox on and add email addresses to create a special distribution list for this workflow module only. | ||
| + | |||
| + | * '''Private assessment?"'''<br/>Select this checkbox on if you do not wish this module's submitted information to automatically appear in reports | ||
| + | |||
| + | * '''Locations for Assessment?"'''<br/>Leave this blank if the Locations for Workflow should be used for this module. Add location(s) if you want different location(s) to be associated with this module. If you have more than one snowpack modules in a workflow they must be for different locations. | ||
==<span style="color: #CC0000;">Information shared in InfoEx</span>== | ==<span style="color: #CC0000;">Information shared in InfoEx</span>== | ||
Revision as of 15:08, 17 November 2019
| REQUIREMENTS | |
| Permission | Submission Moderator and higher |
| Connectivity | Online and offline |
This document describes the functionality of the 'snowpack' workflow module and how to properly configure it for a workflow.
Required permissions:
- You need to be a Operation administrator to create a workflow template.
- You need to be a Submission moderator to initiate a workflow instance.
Required connectivity:
- You need to be online to create a new or edit an existing workflow template.
- If you are online when you initiate a workflow instance the fields will be prefilled from the last workflow instance with the same location(s). Once the workflow instance has been loaded, you can complete the workflow in an offline mode.
- You can initiate a workflow instance when you are offline, and the fields will be filled with the latest cached information on the computer. This will be up to date unless workflows have been submitted using other computers since you were last online on the computer you are currently using.
- If you submit whilst offline the workflow will be uploaded to the InfoEx server the next time you are online. WARNING: If the internet connection is lost whilst this is being done, the workflow may not be submitted and you may lose the data.
Functionality
Including the snowpack module in a workflow template allows you to keep track of the general snowpack structure and the condition of persistent weak layers (PWLs) for the location(s) that is associated with your workflow (or the location(s) associated with this snowpack module step if you have more than one snowpack module in the workflow). The intent of the snowpack workflow module is to provide an electronic equivalent of the generalized snowpack profile that many avalanche safety operations draw on a whiteboard in their office.
| NOTE | Please note that the snowpack description entered in the Snowpack module is different from the Snow Profile observations entered via the Observations module or the 'OBSERVATIONS' menu, which is intended for actual snow profile observations. |
The data entry fields of this workflow module are automatically pre-populated with the last snowpack description and PWL information that was submitted for the location(s) associated with the snowpack step.
| NOTE | If you have multiple workflows for a location (e.g., AM and PM meetings), the information is pre-populated from the last time you submitted any workflow for the location. For example, in a regular rotation, the snowpack step in the PM meeting is pre-populated with information from the AM meeting and the next AM meeting is pre-populated with information from the PM meeting of the previous day. |
You can have multiple Snowpack module steps in a workflow template, and each must be associated with a different location (or group of locations). If you leave the location box in the module blank the location is taken to be the location for the whole workflow.
Any workflow template with a Snowpack module step will automatically have a Workflow summary step added at the end of the workflow. This summary allows users to review their observations and assessments before they are submitted.
The snowpack description and PWL assessments submitted via the Snowpack module are associated with the location(s) specified for the workflow in 'Manage Workflow Definitions' (or the location(s) associated with this snowpack module step if you have defined them for the module).
It is possible to enter the snowpack description and PWL assessment information for previously created PWLs in the workflow module without internet connectivity. You must be online to create a new PWL.
Layout
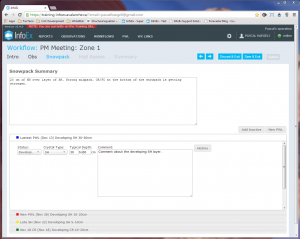
The snowpack module consists of (Fig. 1):
- A free-form text field for the general description of the local snowpack structure
- A list of PWLs representing an idealized snow profile that is sorted the same way as in the snowpack from younger PWLs at the top to older layers towards the bottom.
Click on the PWL's heading to open its data fields.
To add a new PWL, click on the New PWL button. Click here for more information on how to create a new PWL.
To make a PWL disappear from the idealized snow profile, set its status to 'Inactive'. The next time that you complete a snowpack workflow step, the particular PWL will not be included in the profile anymore. Any inactive PWLs can be recovered and added to the profile again (e.g.,when the PWLs become active again in the spring) by clicking on the Add Inactive button and selecting the desired PWL from the list of inactive PWLs. PWLs that have been set to 'inactive' are not showing in the InfoEx report.
Settings
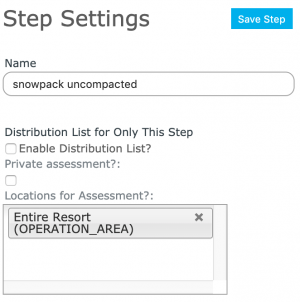
The snowpack workflow module has the following settings (Fig. 2):
- Name
Name of the workflow step shown in the header of the workflow. It is recommended that you choose a short name (e.g., 'Snpk' instead of 'Snowpack and PWLs') to keep the navigation bar of the workflow as tidy as possible.
- Enable Distribution List
Select this checkbox on and add email addresses to create a special distribution list for this workflow module only.
- Private assessment?"
Select this checkbox on if you do not wish this module's submitted information to automatically appear in reports
- Locations for Assessment?"
Leave this blank if the Locations for Workflow should be used for this module. Add location(s) if you want different location(s) to be associated with this module. If you have more than one snowpack modules in a workflow they must be for different locations.
All of the information entered in this workflow module is shared within the InfoEx in the following manner:
- The description of the local snowpack structure is presented in the 'Snowpack Description' table of reports.
- The PWL assessments are presented in the 'Snowpack Description' and 'Persistent Weak Layers' tables of reports.
- The assessments are presented in reports under the location(s) that were associated with the workflow.
- For a given day, reports only show the latest submitted assessments for a workflow location. For example, if you include the snowpack module both in your AM and PM workflow, reports will only show one of these assessments. Depending on the time of the day, it will be either the AM or PM assessments.
Other workflow modules
- Modules for entering data that is shared among InfoEx subscribers
- Modules for entering proprietary data
- Free form module
- Run list module (additional subscription required)
- Avalanche control module (additional subscription required)
- Modules for viewing information
- Other modules
Functionality tested by
- Dec. 24, 2013: Pascal Haegeli

