Difference between revisions of "Adding users to your operation"
Jump to navigation
Jump to search
(→Related documents) |
(→Step-by-step description) |
||
| (9 intermediate revisions by the same user not shown) | |||
| Line 7: | Line 7: | ||
The InfoEx system has four types of users with increasing permission levels: | The InfoEx system has four types of users with increasing permission levels: | ||
| − | * '''User''': Can | + | * '''User''': Can enter observations and view InfoEx reports |
| − | * ''' | + | * '''Submission moderator''': Can submit observations to the InfoEx and execute workflows |
| − | * '''Operation administrator''': Can modify location catalog, define InfoEx report templates and workflows, add and remove users from operation | + | * '''Operation administrator''': Can modify location catalog, define operation level InfoEx report templates and workflows, add and remove users from operation |
* '''Super user''' (CAA only): Can administer the InfoEx and create new operations | * '''Super user''' (CAA only): Can administer the InfoEx and create new operations | ||
| − | Only [[Description of user levels|Operation Administrators]] or [[Description of user levels|Super Users]] can add, edit or delete users from a subscriber operation. See [[Description of user levels]] for a detailed description of the functionality accessible to the different user levels. Only [[Description of user levels|Super Users]] have the credentials create other [[Description of user levels|Super Users]]. | + | Only [[Description of user levels|Operation Administrators]] or [[Description of user levels|Super Users]] can add, edit or delete users from a subscriber operation. See [[Description of user levels]] for a detailed description of the functionality accessible to the different user levels. Only [[Description of user levels|Super Users]] have the credentials to create other [[Description of user levels|Super Users]]. |
==Step-by-step description== | ==Step-by-step description== | ||
| Line 19: | Line 19: | ||
|- | |- | ||
|class="StepNum" | 1. | |class="StepNum" | 1. | ||
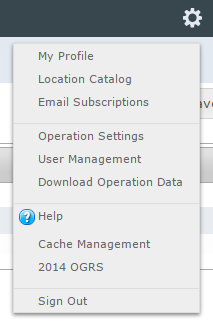
| − | |[[File:AdminMenuOperationAdministrator.png|300px|thumb|right|Fig. 1: Administration menu for operation administrator]] Select ' | + | |[[File:AdminMenuOperationAdministrator.png|300px|thumb|right|Fig. 1: Administration menu for operation administrator]] Select 'User Management' from the administration menu (cog wheel) (Fig. 1). |
|- | |- | ||
|class="StepNum" | 2. | |class="StepNum" | 2. | ||
| Line 29: | Line 29: | ||
|- | |- | ||
|class="StepNum" | 3. | |class="StepNum" | 3. | ||
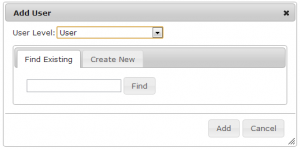
| − | |[[File:AddUserPopupFindBlank.png|300px|thumb|right|Fig. 3: Popup window for adding a user to an operation]] To add a new user to your operation, click on [[File:ButtonAdd.png]] at the top left corner of the user table. This will open a new popup window (Fig. 3). This window allows you to add users that already exists in the | + | |[[File:AddUserPopupFindBlank.png|300px|thumb|right|Fig. 3: Popup window for adding a user to an operation]] To add a new user to your operation, click on [[File:ButtonAdd.png]] at the top left corner of the user table. This will open a new popup window (Fig. 3). This window allows you to add users that already exists in the InfoEx user database or create new users and add them to your operation with the appropriate user levels. |
|- | |- | ||
|class="StepNum" | 4. | |class="StepNum" | 4. | ||
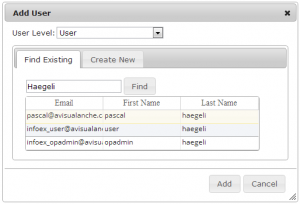
| − | |[[File:AddUserPopupFindList.png|300px|thumb|right|Fig. 4: Popup window for adding a user with list of existing users. First user is highlighted.]] Enter the '''first name''' or '''last name''' of the individual you would like to add to your operation into the text field and click on {{ButtonGrey|Find}}. This will search the user database and return a list of existing users with the particular first or last name (Fig. 4). | + | |[[File:AddUserPopupFindList.png|300px|thumb|right|Fig. 4: Popup window for adding a user with list of existing users. First user is highlighted.]] Enter the '''first name''' or '''last name''' or '''email address''' of the individual you would like to add to your operation into the text field and click on {{ButtonGrey|Find}}. This will search the user database and return a list of existing users with the particular first or last name or email address (Fig. 4). |
|- | |- | ||
|class="StepNum" | 5. | |class="StepNum" | 5. | ||
| − | |If you found the person you would like to add to your operation, select the person by clicking on it, which will | + | |If you found the person you would like to add to your operation, select the person by clicking on it, which will highlight it in blue (Fig. 4). Select the appropriate permission level from the dropdown list at the top of the popup window and click {{ButtonGrey|Add}} at the bottom right of the popup window. This will close the popup window and the new user will be added to the user table of our operation. |
| − | {{Note|People you added to your operation will receive an automatic email | + | {{Note|People you added to your operation will receive an automatic email message from InfoEx notifying them they they have been added to your operation and that they can access the InfoEx for your operation with their existing credentials.}} |
|- | |- | ||
|class="StepNum" | 6. | |class="StepNum" | 6. | ||
| − | |[[File:AddUserPopupCreateNew.png|300px|thumb|right|Fig. 5: Popup window for creating a new user in the | + | |[[File:AddUserPopupCreateNew.png|300px|thumb|right|Fig. 5: Popup window for creating a new user in the InfoEx user database.]]If your search did not bring up the person you were looking, it means that this person does not have a personal InfoEx account yet. You can either |
* tell the person to create their own account (see [[Signing up for a personal InfoEx account]] for more information) and add them to your operation later, or | * tell the person to create their own account (see [[Signing up for a personal InfoEx account]] for more information) and add them to your operation later, or | ||
* create an account for them yourself and add them to your operation right away | * create an account for them yourself and add them to your operation right away | ||
| Line 45: | Line 45: | ||
|- | |- | ||
|class="StepNum" | 7. | |class="StepNum" | 7. | ||
| − | |Enter the required information into the form (all fields are required), select the appropriate permission level from the dropdown list at the top of the popup window and click {{ButtonGrey|Add}} at the bottom right of the popup window. This will close the popup window and the new user will be added to the user table of | + | |Enter the required information into the form (all fields are required), select the appropriate permission level from the dropdown list at the top of the popup window and click {{ButtonGrey|Add}} at the bottom right of the popup window. This will close the popup window and the new user will be added to the user table of your operation. |
| − | {{Issue|You currently only get an error message when you try to create a new account with an email address that is already in use. You currently do not get an error message when there is another | + | {{Issue|You currently only get an error message when you try to create a new account with an email address that is already in use. You currently do not get an error message when there is another issue with an email address, such as a trailing space or other character that is not allowed. The application will add the user with a bad email address and the user will not receive email notification he has been added to your operation. If this happens, add the user again with the correct email address and ask InfoEx support staff at the CAA to delete the incorrect email address.|IssueNoImage||Dec. 22, 2013}} |
| − | {{Note|Make sure that you are entering an active email address for the person as this email address will be the person's InfoEx username and all | + | {{Note|Make sure that you are entering an accurate and active email address for the person as this email address will be the person's InfoEx username and their welcome email and all report emails will be sent to this email address|NoteNoImage}} |
| − | {{Note|People you created new accounts for will receive an automatic email | + | {{Note|People you created new accounts for will receive an automatic welcome email message from InfoEx providing them with their credentials and notifying them that they can access the InfoEx through your operation.}} |
|} | |} | ||
Latest revision as of 11:19, 4 February 2019
| REQUIREMENTS | |
| Permission | Operation Administrator or higher |
| Connectivity | Online only |
This page describes how to add users to your operation.
Background
The InfoEx system has four types of users with increasing permission levels:
- User: Can enter observations and view InfoEx reports
- Submission moderator: Can submit observations to the InfoEx and execute workflows
- Operation administrator: Can modify location catalog, define operation level InfoEx report templates and workflows, add and remove users from operation
- Super user (CAA only): Can administer the InfoEx and create new operations
Only Operation Administrators or Super Users can add, edit or delete users from a subscriber operation. See Description of user levels for a detailed description of the functionality accessible to the different user levels. Only Super Users have the credentials to create other Super Users.
Step-by-step description
| 1. | Select 'User Management' from the administration menu (cog wheel) (Fig. 1). | ||||||
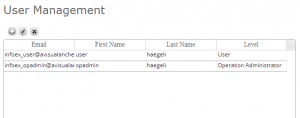
| 2. | This will get you to the user management section of the InfoEx application (Fig. 2). This section consists of a simple table that list all of the users associated with your operation. The columns of the table are:
| ||||||
| 3. | To add a new user to your operation, click on | ||||||
| 4. | Enter the first name or last name or email address of the individual you would like to add to your operation into the text field and click on Find. This will search the user database and return a list of existing users with the particular first or last name or email address (Fig. 4). | ||||||
| 5. | If you found the person you would like to add to your operation, select the person by clicking on it, which will highlight it in blue (Fig. 4). Select the appropriate permission level from the dropdown list at the top of the popup window and click Add at the bottom right of the popup window. This will close the popup window and the new user will be added to the user table of our operation.
| ||||||
| 6. | If your search did not bring up the person you were looking, it means that this person does not have a personal InfoEx account yet. You can either
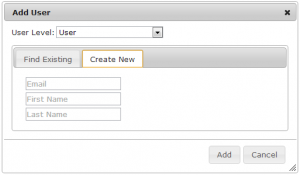
To create an account for the person, click on the 'Create New' tab in the popup window, which will reveal the form for creating a new user (Fig. 5). | ||||||
| 7. | Enter the required information into the form (all fields are required), select the appropriate permission level from the dropdown list at the top of the popup window and click Add at the bottom right of the popup window. This will close the popup window and the new user will be added to the user table of your operation.
|
Related documents
- Adding users to your operation
- Changing the permission level of an existing user of your operation
- Removing a user from your operation
Functionality tested by
- Dec. 22: Pascal Haegeli
