Difference between revisions of "Creating a workflow template"
Jump to navigation
Jump to search
(→Adding steps to the workflow template) |
(→Adding steps to the workflow template) |
||
| (18 intermediate revisions by 2 users not shown) | |||
| Line 22: | Line 22: | ||
|- | |- | ||
|class="StepNum" | 2. | |class="StepNum" | 2. | ||
| − | |[[File:WorkflowSettings.png|300px|thumb|right|Fig. 2: Workflow settings]]Under the column heading 'Workflows' you will see a list of existing workflows (if any) and an {{ButtonBlue | Add New Workflow}} button. Clicking this button begins creation of a new workflow and | + | |[[File:WorkflowSettings.png|300px|thumb|right|Fig. 2: Workflow settings]]Under the column heading 'Workflows' you will see a list of existing workflows (if any) and an {{ButtonBlue | Add New Workflow}} button. Clicking this button begins creation of a new workflow and opens the central panel of the screen with the title 'Workflow Settings' (Fig. 2). This is the area where you specify the general settings of your workflow. |
|- | |- | ||
|class="StepNum" | 4. | |class="StepNum" | 4. | ||
| Line 28: | Line 28: | ||
|- | |- | ||
|class="StepNum" | 5. | |class="StepNum" | 5. | ||
| − | | | + | |For workflow modules that involve data submission ([[Observations module]], [[Snowpack module]], [[Hazard assessment module]], [[Hazard comment module]]), you need to associate your workflow to a location. Enter one or multiple locations into the 'Locations for Workflow' field by clicking on it and start typing. The dropdown list will show your location catalog filtered to what matches your typing. |
{{Note|The location(s) associated with workflow are used in two ways: | {{Note|The location(s) associated with workflow are used in two ways: | ||
* They are the location associated with the data submitted from the [[Snowpack module]], the [[Hazard assessment module]], and the [[Hazard comment module]]. | * They are the location associated with the data submitted from the [[Snowpack module]], the [[Hazard assessment module]], and the [[Hazard comment module]]. | ||
* They determine that previously entered & shared observations are pulled into the workflow in the [[Observations module]]. Only previously entered and shared observation that fall under the hierarchy of the specified location(s) are shown within a workflow.}} | * They determine that previously entered & shared observations are pulled into the workflow in the [[Observations module]]. Only previously entered and shared observation that fall under the hierarchy of the specified location(s) are shown within a workflow.}} | ||
{{Note|For the majority of users, associating their workflows with their entire [[Location_types_and_symbology#OperationArea|operation area]] (the top parent of your [[Location hierarchy]]) will be the best setup. Only operations with multiple, distinct forecast regions (e.g., consulting companies, highway and railway forecasting operations) will find it meaningful to associate workflows with forecast areas or operating zones.}} | {{Note|For the majority of users, associating their workflows with their entire [[Location_types_and_symbology#OperationArea|operation area]] (the top parent of your [[Location hierarchy]]) will be the best setup. Only operations with multiple, distinct forecast regions (e.g., consulting companies, highway and railway forecasting operations) will find it meaningful to associate workflows with forecast areas or operating zones.}} | ||
| + | |- | ||
| + | |class="StepNum" | 6. | ||
| + | |Check the box to Enable a distribution list and then enter email addresses by clicking on the plus symbol. | ||
|} | |} | ||
| Line 41: | Line 44: | ||
|class="StepNum" | 1. | |class="StepNum" | 1. | ||
|[[file:WorkflowStepType.png|300px|thumb|right|Fig 3: Select step type]] To add a step to your workflow template, select one of the available modules from the dropdown list under the 'Workflow Steps' section title (Fig. 3). The currently available workflow modules include: | |[[file:WorkflowStepType.png|300px|thumb|right|Fig 3: Select step type]] To add a step to your workflow template, select one of the available modules from the dropdown list under the 'Workflow Steps' section title (Fig. 3). The currently available workflow modules include: | ||
| − | + | {{ListWorkflowModules|}} | |
| − | + | {{Note|The [[Context module]] cannot explicitly be added to a workflow. Instead, it is automatically added at the beginning of all workflows.|NoteWithImage}} | |
| − | + | ||
| − | + | ||
| − | |||
| − | |||
| − | |||
| − | |||
| − | |||
| − | {{ | ||
| − | |||
| − | |||
| − | {{Note|The [[Context module]] cannot explicitly be added to a workflow. Instead, it is automatically added at the beginning of | ||
|- | |- | ||
|class="StepNum" | 2. | |class="StepNum" | 2. | ||
| Line 62: | Line 56: | ||
|class="StepNum" | 3. | |class="StepNum" | 3. | ||
|Specify the module-specific settings for the workflow step. See the documentation on the individual workflow modules for more information on the available settings: | |Specify the module-specific settings for the workflow step. See the documentation on the individual workflow modules for more information on the available settings: | ||
| − | + | {{ListWorkflowModules|Settings}} | |
| − | |||
| − | |||
| − | |||
| − | |||
| − | |||
| − | |||
| − | |||
| − | |||
|- | |- | ||
|class="StepNum" | 4. | |class="StepNum" | 4. | ||
| Line 77: | Line 63: | ||
|class="StepNum" | 5. | |class="StepNum" | 5. | ||
|Repeat steps 1 to 4 until you have created your entire workflow. | |Repeat steps 1 to 4 until you have created your entire workflow. | ||
| − | {{Note|A [[Context module]] is automatically added at the beginning of | + | {{Note|A [[Context module]] is automatically added at the beginning of all workflows.}} |
|- | |- | ||
|class="StepNum" | 6. | |class="StepNum" | 6. | ||
| Line 93: | Line 79: | ||
|class="StepNum" | 1. | |class="StepNum" | 1. | ||
|[[file:SaveWorkflowSettings.png|300px|thumb|right|Fig 5: Save workflow steps and settings]] Click on {{ButtonBlue|Save Workflow}} to save your workflow. | |[[file:SaveWorkflowSettings.png|300px|thumb|right|Fig 5: Save workflow steps and settings]] Click on {{ButtonBlue|Save Workflow}} to save your workflow. | ||
| − | |||
| − | |||
| − | |||
| − | |||
| − | |||
| − | |||
| − | |||
| − | |||
| − | |||
| − | |||
| − | |||
| − | |||
| − | |||
| − | |||
| − | |||
| − | |||
| − | |||
| − | |||
| − | |||
| − | |||
| − | |||
| − | |||
| − | |||
| − | |||
| − | |||
| − | |||
| − | |||
| − | |||
| − | |||
| − | |||
| − | |||
| − | |||
| − | |||
| − | |||
| − | |||
| − | |||
| − | |||
| − | |||
| − | |||
| − | |||
| − | |||
| − | |||
| − | |||
| − | |||
| − | |||
| − | |||
| − | |||
| − | |||
| − | |||
| − | |||
|} | |} | ||
==Related documents== | ==Related documents== | ||
| − | + | {{PagesWorkflowAdmin}} | |
| − | |||
==Functionality tested by== | ==Functionality tested by== | ||
| − | * | + | * Dec. 24, 2013: Pascal Haegeli |
| − | [[Category:Workflows]] | + | [[Category:Super User]][[Category:Operation Administrator]][[Category:Workflows]][[Category:Version 3.4.0]] |
Latest revision as of 16:15, 17 November 2019
| REQUIREMENTS | |
| Permission | Operation administrator and higher |
| Connectivity | Online and partial offline |
This document describes how to create a new workflow template in the InfoEx system.
Background
A workflow template links together user-specified tasks into a logical order so that users can repeatedly move through the same steps. See Workflow overview for more background information on this feature of the InfoEx application.
Creating a workflow template consists of three main steps:
- Creating a workflow template and choosing its general features
- Adding steps to the workflow template
- Saving the workflow template
Step-by-step description
Creating a workflow template and choosing its general features
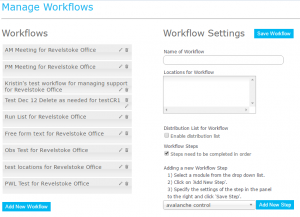
| 1. | Click on WORKFLOWS in the main menu and select ‘Manage workflow definitions’. This will take you to the ‘Manage Workflows’ page of the InfoEx application (Fig. 1). | ||||
| 2. | Under the column heading 'Workflows' you will see a list of existing workflows (if any) and an Add New Workflow button. Clicking this button begins creation of a new workflow and opens the central panel of the screen with the title 'Workflow Settings' (Fig. 2). This is the area where you specify the general settings of your workflow. | ||||
| 4. | Enter a meaningful name for the workflow into the 'Name of Workflow' field. | ||||
| 5. | For workflow modules that involve data submission (Observations module, Snowpack module, Hazard assessment module, Hazard comment module), you need to associate your workflow to a location. Enter one or multiple locations into the 'Locations for Workflow' field by clicking on it and start typing. The dropdown list will show your location catalog filtered to what matches your typing.
| ||||
| 6. | Check the box to Enable a distribution list and then enter email addresses by clicking on the plus symbol. |
Adding steps to the workflow template
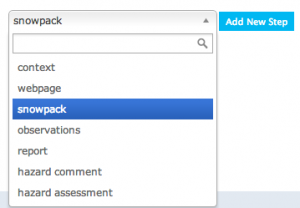
| 1. | To add a step to your workflow template, select one of the available modules from the dropdown list under the 'Workflow Steps' section title (Fig. 3). The currently available workflow modules include:
| ||
| 2. | Click on Add New Step add a step of the chosen workflow module to your workflow (Fig. 3). This will add
| ||
| 3. | Specify the module-specific settings for the workflow step. See the documentation on the individual workflow modules for more information on the available settings:
| ||
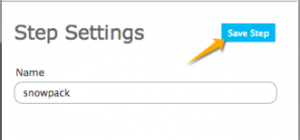
| 4. | Click on Save Step to save the module-specific settings for the step that you just added to your workflow. | ||
| 5. | Repeat steps 1 to 4 until you have created your entire workflow.
| ||
| 6. | To change the order of steps in your workflow, click on the label of your step under the 'Workflow Steps' section title and drag it up or down to the desired location within your workflow. | ||
| 7. | You can specify whether the steps in your workflow need to be completed in strict order (i.e., no skipping steps) by checking the checkbox provided as the last item under the 'Workflow Settings' column.
|
Saving the workflow template
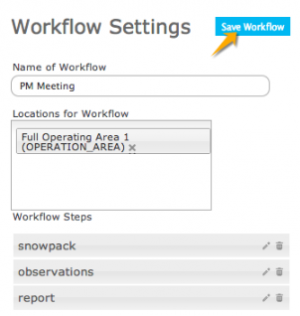
| 1. | Click on Save Workflow to save your workflow. |
Related documents
Functionality tested by
- Dec. 24, 2013: Pascal Haegeli


