| REQUIREMENTS |
| Permission |
Operation Administrator and higher |
| Connectivity |
Online only |
This document describes how to create location geometries with the available drawing tool directly in the InfoEx system.
Step-by-step description
The following sections discuss the creation of polygon, line and point geometries separately:
- Drawing a polygon
Location types that support a polygon geometry include Operation area, Forecast area, Operating zone, Permanent closure, Ski run and Avalanche path.
- Drawing a line
Location types that support a line geometry include Road, Rail, Route, Control Route, Ski run and Avalanche path.
- Drawing a point
Location types that support a point geometry include Operation area, Ski run, Avalanche path, Weather site and Shot placement.
| ISSUE |
The system currently does not support multi-geometries (i.e., multiple, separate polygons, lines or points associated with a single location).
Workaround: Please contact InfoEx support staff at the CAA to discuss possible solutions.
JIRA: -772 (Aug.13, 2013) |
Drawing a polygon
Location types that support a polygon geometry include Operation area, Forecast area, Operating zone, Permanent closure, Ski run and Avalanche path.
| 1.
|
After entering the name and abbreviation of a location move to the map to enter the appropriate geometry.
|
| 2.
|
Drag the map to the desired general location zooming in or out if necessary.
|
| 3.
|
To show the geometries of all of your existing locations, click to check on Location Catalogue.
|
| 4.
|
To show the boundaries of the mountain range polygons used for creating the mountain range associations in the InfoEx report, click to check on Mountain Ranges.
|
| 5.
|
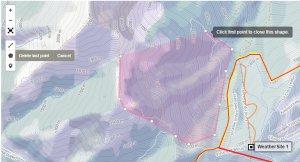 Fig. 1: Drawing a polygon  button. This will turn your cursor into a cross and you can start creating corner points for your new polygon by click on the map at desired locations (Fig. 1). Click on your first point to complete your polygon. button. This will turn your cursor into a cross and you can start creating corner points for your new polygon by click on the map at desired locations (Fig. 1). Click on your first point to complete your polygon.
| NOTE |
Please note that you cannot edit points with this tool. Use the Delete Last Point or Cancel options or complete your polygon and move on to the next instruction point if you want to edit your polygon. |
|
| 6.
|
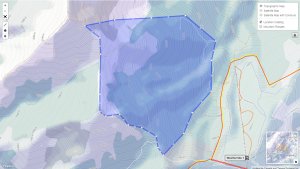 Fig. 2: Editing a polygon. Note the smaller, faint points between the main corner points. - To edit an existing point, click on it and drag it to the desired new location
- To increase the complexity of your polygon, add an additional point by dragging one of the shaded circles between two existing corner points to the desired location
- To delete an existing point, click on it.
- To create more shaded points click on an existing shaded point where you want extra points to appear.
To completely start fresh, click on the button and draw your polygon again. The polygon you are replacing will remain visible until you complete drawing the new polygon.
|
| 7.
|
Once you are happy with the shape of your polygon, click on Add in the left panel of the application to submit the new location to the InfoEx database. If you have forgotten to complete one of the required fields, you will get an error message and the incomplete field will be highlighted with a red frame.
| NOTE |
Depending on the complexity of your geometry and the speed of your internet connection, submitting your location to the database might take up to a minute. Please be patient! |
|
Drawing a line
Location types that support a line geometry include Road, Rail, Route, Ski run and Avalanche path.
| 1.
|
After entering the name and abbreviation of a location move to the map to enter the appropriate geometry.
|
| 2.
|
To navigate on the map, click on the  button. You can then click and drag the map to the desired general location. You can also use the familiar Google Earth navigation tool in the top right corner of the map to navigate around. button. You can then click and drag the map to the desired general location. You can also use the familiar Google Earth navigation tool in the top right corner of the map to navigate around.
|
| 3.
|
To show the geometries of all of your existing location, click on the  button. The button will change to button. The button will change to  when the geometries are shown. when the geometries are shown.
|
| 4.
|
To show the boundaries of the mountain range polygons used for creating the mountain range associations in the InfoEx report, click on the  button. button.
|
| 5.
|
 Fig. 3: Drawing a new line  button. This will turn your cursor into a circle and you can start creating points for your new line by click on the map at desired locations (Fig. 3). button. This will turn your cursor into a circle and you can start creating points for your new line by click on the map at desired locations (Fig. 3).
| NOTE |
Please note that this tool only allows you to draw the initial corner points. You cannot edit points with this tool. Move on to the next point if you have made a mistake or want to edit your line for other reasons. |
|
| 6.
|
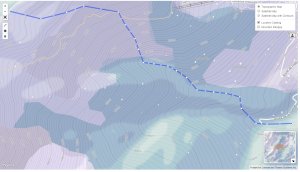 Fig. 4: Editing a line. Note the smaller, faint points between the main corner points.  botton. This will turn your cursor into an arrow and in addition to the regular circles at on the corner points, the line will now also have smaller and faint circles in the middle between each corner points (Fig. 4). You have the following options for editing your polygon: botton. This will turn your cursor into an arrow and in addition to the regular circles at on the corner points, the line will now also have smaller and faint circles in the middle between each corner points (Fig. 4). You have the following options for editing your polygon:
- To edit an existing point, click on it and drag it to the desired new location
- To increase the complexity of your polygon, add an additional point by clicking on one of the faint point between two existing corner points and drag it to the desired location
- To delete an existing point, double-click on it.
To completely erase your line and start fresh, click on the button and draw your line again.
|
| 7.
|
Once you are happy with the shape of your line, click on Add in the left panel of the application to submit the new location to the InfoEx database. If you have forgotten to complete one of the required fields, you will get an error message and the incomplete field will be highlighted with a red frame.
| NOTE |
Depending on the complexity of your geometry and the speed of your internet connection, submitting your location to the database might take up to a minute. Please be patient! |
|
Drawing a point
Location types that support a point geometry include Operation area, Ski run, Avalanche path, Weather site and Shot placement
Related documents
Functionality tested by


